forked from agent-lab/smolagents

180 lines
No EOL
6.3 KiB
Markdown
180 lines
No EOL
6.3 KiB
Markdown
# 使用 OpenTelemetry 检查运行记录
|
||
|
||
[[open-in-colab]]
|
||
|
||
> [!TIP]
|
||
> 如果您是初次构建Agent,建议先阅读 [Agent 入门指南](../conceptual_guides/intro_agents) 和 [smolagents 导览](../guided_tour)。
|
||
|
||
## 为什么需要记录Agent运行?
|
||
|
||
调试Agent运行过程具有挑战性。
|
||
|
||
验证运行是否正常进行很困难,因为Agent的工作流程本身具有 [设计上的不可预测性](../conceptual_guides/intro_agents)(如果可预测,直接使用传统代码即可)。
|
||
|
||
检查运行记录同样困难:多步骤的Agent往往会快速在控制台生成大量日志,而大多数错误只是"LLM 低级错误"类型的问题,通常LLM会在后续步骤中通过生成更好的代码或工具调用来自我修正。
|
||
|
||
因此,在生产环境中使用监控工具记录Agent运行过程,对于后续检查和分析至关重要!
|
||
|
||
我们采用 [OpenTelemetry](https://opentelemetry.io/) 标准来实现Agent运行监控。
|
||
|
||
这意味着您只需添加少量监控代码,即可在正常运行Agent时自动记录所有信息到监控平台。以下是在不同OpenTelemetry后端实现此功能的示例:
|
||
|
||
在监控平台上的展示效果如下:
|
||
|
||
<div class="flex justify-center">
|
||
<img src="https://huggingface.co/datasets/huggingface/documentation-images/resolve/main/smolagents/inspect_run_phoenix.gif"/>
|
||
</div>
|
||
|
||
|
||
## 使用 Arize AI Phoenix 配置遥测
|
||
|
||
首先安装必要的软件包。这里我们选择安装 [Arize AI 的 Phoenix](https://github.com/Arize-ai/phoenix) 作为日志收集和检查方案,您也可以使用其他兼容 OpenTelemetry 的平台来完成收集与检查工作。
|
||
|
||
```shell
|
||
pip install 'smolagents[telemetry]'
|
||
```
|
||
|
||
接着在后台运行日志收集器:
|
||
|
||
```shell
|
||
python -m phoenix.server.main serve
|
||
```
|
||
|
||
最后配置 `SmolagentsInstrumentor` 来追踪Agent活动,并将追踪数据发送至 Phoenix 默认端点:
|
||
|
||
```python
|
||
from phoenix.otel import register
|
||
from openinference.instrumentation.smolagents import SmolagentsInstrumentor
|
||
|
||
register()
|
||
SmolagentsInstrumentor().instrument()
|
||
```
|
||
|
||
完成上述配置后,即可正常运行您的Agent!
|
||
|
||
```py
|
||
from smolagents import (
|
||
CodeAgent,
|
||
ToolCallingAgent,
|
||
WebSearchTool,
|
||
VisitWebpageTool,
|
||
InferenceClientModel,
|
||
)
|
||
|
||
model = InferenceClientModel()
|
||
|
||
search_agent = ToolCallingAgent(
|
||
tools=[WebSearchTool(), VisitWebpageTool()],
|
||
model=model,
|
||
name="search_agent",
|
||
description="This is an agent that can do web search.",
|
||
)
|
||
|
||
manager_agent = CodeAgent(
|
||
tools=[],
|
||
model=model,
|
||
managed_agents=[search_agent],
|
||
)
|
||
manager_agent.run(
|
||
"If the US keeps its 2024 growth rate, how many years will it take for the GDP to double?"
|
||
)
|
||
```
|
||
Voilà!
|
||
|
||
此时访问 `http://0.0.0.0:6006/projects/` 即可查看运行记录:
|
||
|
||
<img src="https://huggingface.co/datasets/huggingface/documentation-images/resolve/main/smolagents/inspect_run_phoenix.png">
|
||
|
||
如图所示,CodeAgent 调用了其托管的 ToolCallingAgent(注:托管Agent也可以是另一个 CodeAgent)执行美国2024年经济增长率的网络搜索。托管Agent返回报告后,管理Agent根据结果计算出经济翻倍周期!是不是很智能?
|
||
|
||
## 使用 🪢 Langfuse 配置遥测
|
||
|
||
本部分演示如何通过 `SmolagentsInstrumentor` 使用 **Langfuse** 监控和调试 Hugging Face **smolagents**。
|
||
|
||
> **Langfuse 是什么?** [Langfuse](https://langfuse.com) 是面向LLM工程的开源平台,提供AI Agent的追踪与监控功能,帮助开发者调试、分析和优化产品。该平台通过原生集成、OpenTelemetry 和 SDKs 与各类工具框架对接。
|
||
|
||
### 步骤 1: 安装依赖
|
||
|
||
```python
|
||
%pip install langfuse 'smolagents[telemetry]' openinference-instrumentation-smolagents
|
||
```
|
||
|
||
### 步骤 2: 配置环境变量
|
||
|
||
设置 Langfuse API 密钥,并配置 OpenTelemetry 端点将追踪数据发送至 Langfuse。通过注册 [Langfuse Cloud](https://cloud.langfuse.com) 或 [自托管 Langfuse](https://langfuse.com/self-hosting) 获取 API 密钥。
|
||
|
||
同时需添加 [Hugging Face 令牌](https://huggingface.co/settings/tokens) (`HF_TOKEN`) 作为环境变量:
|
||
```python
|
||
import os
|
||
# Get keys for your project from the project settings page: https://cloud.langfuse.com
|
||
os.environ["LANGFUSE_PUBLIC_KEY"] = "pk-lf-..."
|
||
os.environ["LANGFUSE_SECRET_KEY"] = "sk-lf-..."
|
||
os.environ["LANGFUSE_HOST"] = "https://cloud.langfuse.com" # 🇪🇺 EU region
|
||
# os.environ["LANGFUSE_HOST"] = "https://us.cloud.langfuse.com" # 🇺🇸 US region
|
||
|
||
# your Hugging Face token
|
||
os.environ["HF_TOKEN"] = "hf_..."
|
||
```
|
||
|
||
```python
|
||
from langfuse import get_client
|
||
|
||
langfuse = get_client()
|
||
|
||
# Verify connection
|
||
if langfuse.auth_check():
|
||
print("Langfuse client is authenticated and ready!")
|
||
else:
|
||
print("Authentication failed. Please check your credentials and host.")
|
||
```
|
||
|
||
### 步骤 3: 初始化 `SmolagentsInstrumentor`
|
||
|
||
在应用程序代码执行前初始化 `SmolagentsInstrumentor`。
|
||
|
||
|
||
```python
|
||
from openinference.instrumentation.smolagents import SmolagentsInstrumentor
|
||
|
||
SmolagentsInstrumentor().instrument()
|
||
```
|
||
|
||
### 步骤 4: 运行 smolagent
|
||
|
||
```python
|
||
from smolagents import (
|
||
CodeAgent,
|
||
ToolCallingAgent,
|
||
WebSearchTool,
|
||
VisitWebpageTool,
|
||
InferenceClientModel,
|
||
)
|
||
|
||
model = InferenceClientModel(
|
||
model_id="deepseek-ai/DeepSeek-R1-Distill-Qwen-32B"
|
||
)
|
||
|
||
search_agent = ToolCallingAgent(
|
||
tools=[WebSearchTool(), VisitWebpageTool()],
|
||
model=model,
|
||
name="search_agent",
|
||
description="This is an agent that can do web search.",
|
||
)
|
||
|
||
manager_agent = CodeAgent(
|
||
tools=[],
|
||
model=model,
|
||
managed_agents=[search_agent],
|
||
)
|
||
manager_agent.run(
|
||
"How can Langfuse be used to monitor and improve the reasoning and decision-making of smolagents when they execute multi-step tasks, like dynamically adjusting a recipe based on user feedback or available ingredients?"
|
||
)
|
||
```
|
||
|
||
### 步骤 5: 在 Langfuse 中查看追踪记录
|
||
|
||
运行Agent后,您可以在 [Langfuse](https://cloud.langfuse.com) 平台查看 smolagents 应用生成的追踪记录。这些记录会详细展示LLM的交互步骤,帮助您调试和优化AI代理。
|
||
|
||
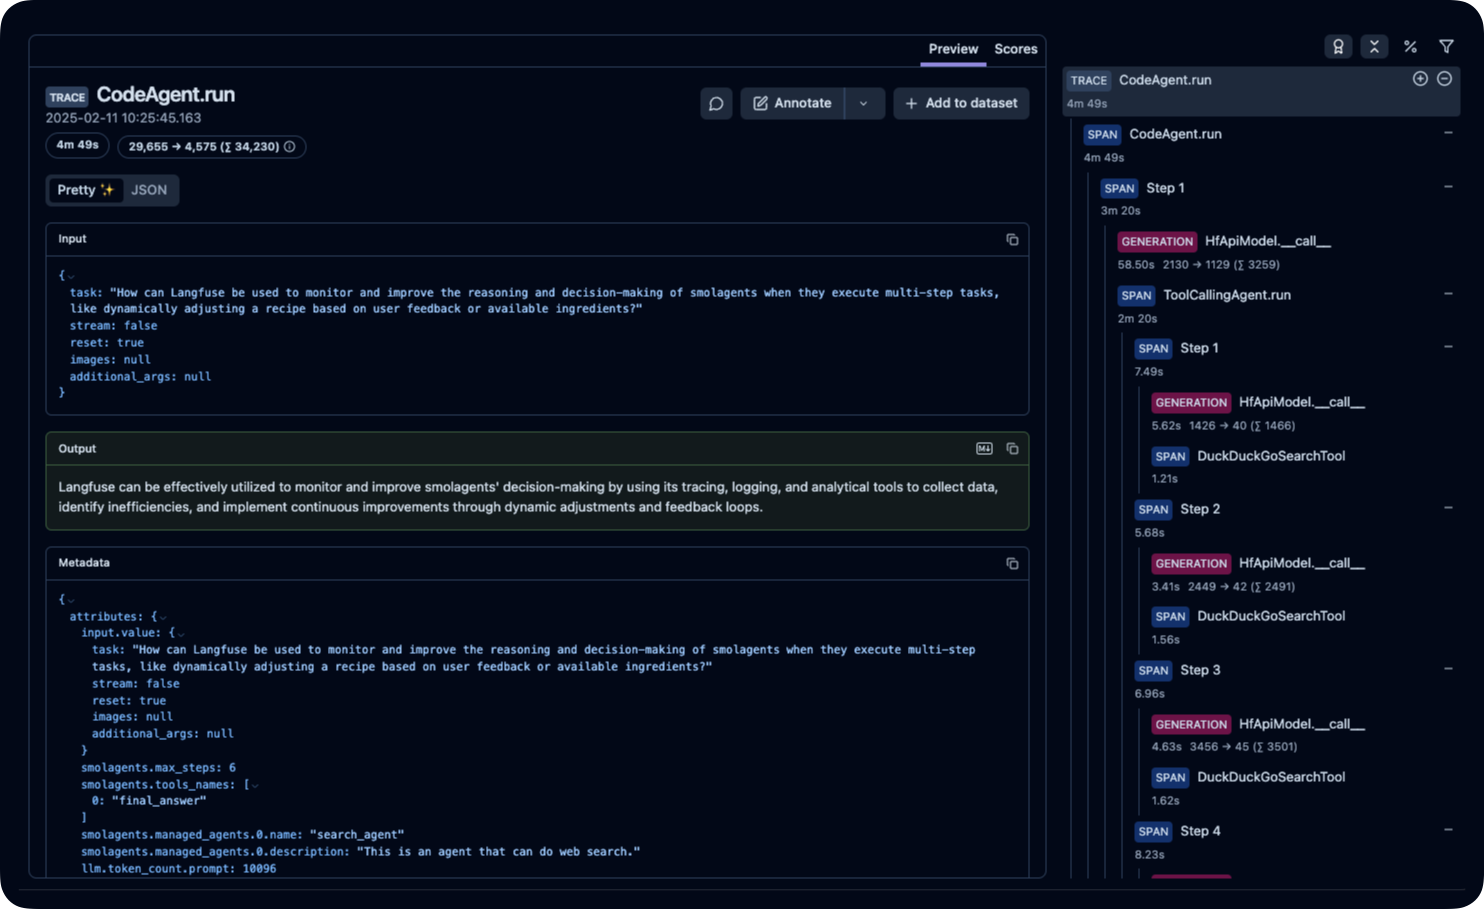
|
||
|
||
_[Langfuse 公开示例追踪](https://cloud.langfuse.com/project/cloramnkj0002jz088vzn1ja4/traces/ce5160f9bfd5a6cd63b07d2bfcec6f54?timestamp=2025-02-11T09%3A25%3A45.163Z&display=details)_ |